What we will show
In this article we will showcase how to quickly configure a layline.io workflow to query a REST-API using the Yahoo Finance API as an example. We will create a workflow which polls the Yahoo for stock quotes in frequent intervals.
Setting up the Http-Service
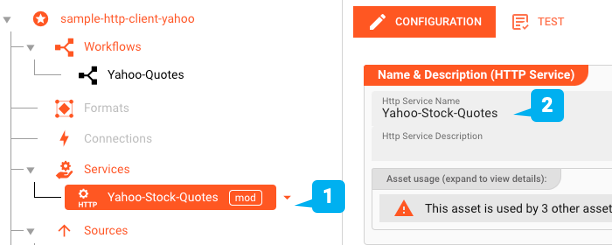
First we fire up the web-UI and create a new Project "sample-http-client-yahoo". We then create a Http-Service Asset "Yahoo-Finance-Source".
What are Services?
Services in layline.io represent specific assets which encapsulate complex interfaces definitions and then expose them to other Assets as simple named function calls for easy invocation. REST-API definitions fit that pattern, as well as for example database statements. For this purpose layline.io provides a number of Service Assets which are geared towards the specific interface types, such as Http, JDBC, Aerospike, and more. In our example, we will use the Http-Service Asset to access the Yahoo Finance API.
The Yahoo stock quotes REST-API
Yahoo Finance provides a very comprehensive API to access financial information publicly traded companies. For this demo we are going through Rapid-API which acts as a proxy service. If you don't know Rapid-API you should check it out. It's really cool.
You can look up the exact URL for the service, and it's description here, then check for the path "market/v2/get-quotes".
Configuring the Http-Service
Using the Configuration Center we create a Http-Service Asset:
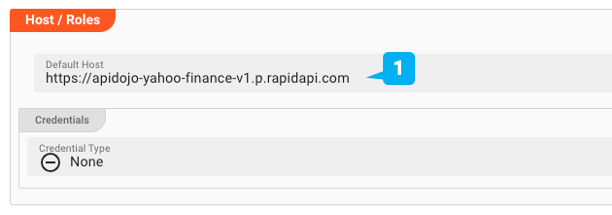
Host
Next we define the generic host address at which the data can be accessed. This does not require credentials, but API Keys which we will define later.
Requests
Before we define Functions, we make sure that layline.io understand the requests and corresponding responses. You can define any number of requests. Here we only define "GetQuotes" which should retrieve the stock quotes and related data for a given number of stock ticker symbols. This is also where the path to the request is defined. Additionally, we configure the parameters required to invoke the API (region and symbols, as well as the RapidAPI key and host). We provide the values when we define the Source Asset in a next step.
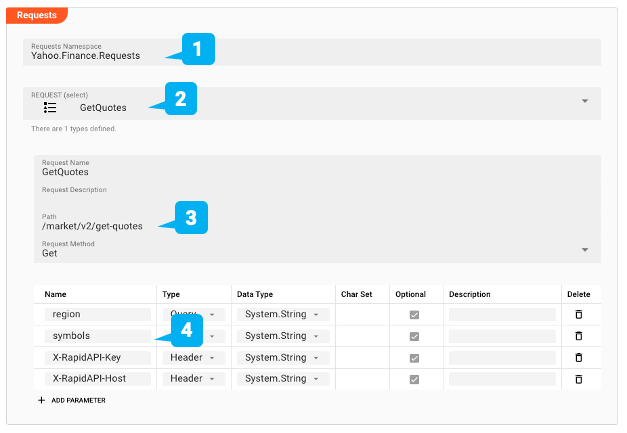
If we wanted to use other requests, we could just simply add them here.
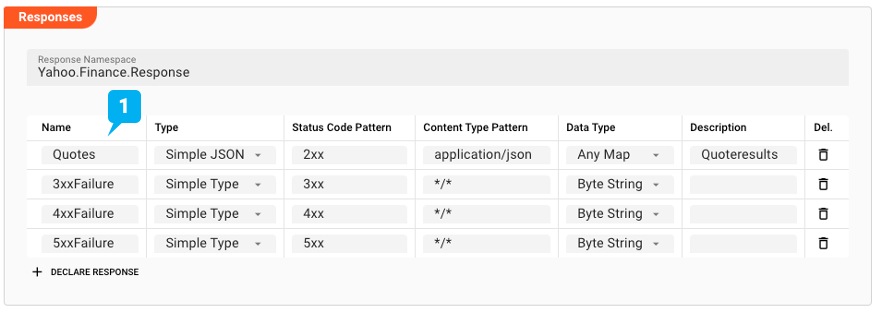
Response
Next we define possible responses to our request. We expect a JSON document which we have defined in "Quotes". layline.io is strongly typed. In our case we simply map the response to the internal "AnyMap" type. Additional responses could be 3xx to 5xx failures which we are also interested in.
Functions
Now that we have defined request and responses, we can create the abstract functions which we want to expose internally.
We create a function by the name of "GetQuotes". It references the request by the same name which we have created above, and assign possible responses to this request ("Quotes").

We can now access the Yahoo Finance API by simply invoking the function "GetQuotes" and pass the required parameters to it. We will see an example for this when we define the Service Source below.
Alas, quite a bit to configure for a first Http-Service. But note that additional requests to the same host can be added very quickly.
Configuring the Service-Source
We plan to constantly query the API for the latest stock data and will want to treat it as a regular data source in the workflow. We need to define a Service-Source Asset for this. A Service-Source Asset is a special type of Source that uses Functions defined in Service Assets, just like the one we have defined above.
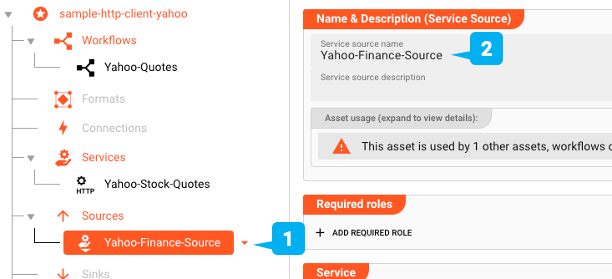
We link the Http-Service we have defined to this Source:

Finally, we set up the API polling frequency and the actual API call parameters.
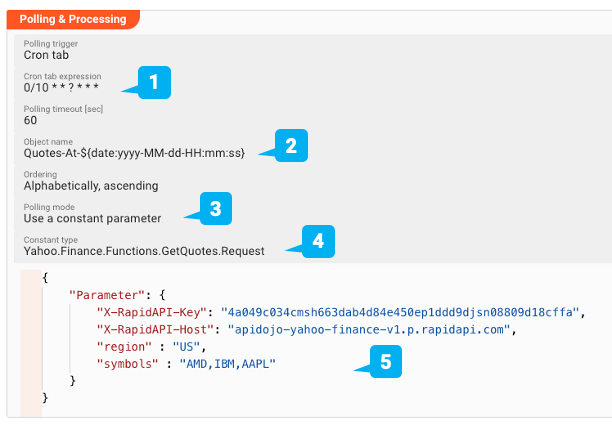
Via a cron-table-like setting we define a query interval of 10 seconds. Object name denotes the name of the object which will be returned by each query. Note that we add the date and time to the object name to distinguish each response object. We use a constant parameter for polling, which means nothing else than that we want to pass hard coded parameters to the Service Function instead of dynamic parameters. So we are always invoking the function for the same stock ticker symbols in our example. The Constant Type describes the path to the actual Service Function which we want to call and its request object. For now this needs to be entered manually, but will be user guided shortly. We enter Yahoo.Finance.Functions.GetQuotes.Request here.
Lastly, we provide the parameters which we want to pass to the GetQuotes function in JSON-format. Remember that we have defined them when we created the Http-Service Asset.
That's it, we can now create the actual Workflow.
Creating the Workflow
We head over to the Workflow UI and set up a simple Workflow with a Stream-Input and a JavaScript Processor.
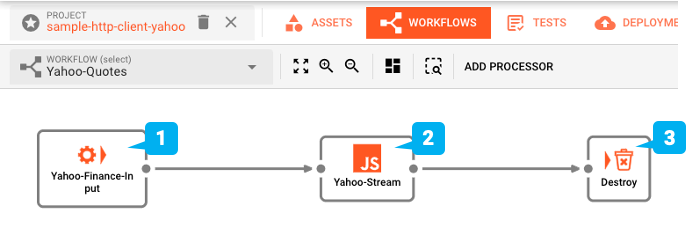
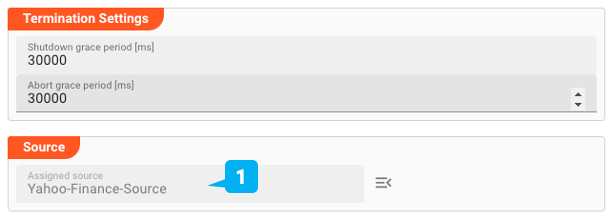
In the settings for the Service-Input Asset we link it to the Http-Source which we have just created.
For the Javascript Processor we add a very simple script which outputs the received message to the stream log. This is how we can inspect the results via the Audit Trail in the UI. Of course, you would normally not output the results to the log, but process it downstream in the Workflow.

Deploy to Cluster and run
We are ready to test the Workflow. To do so we need to deploy it to a Reactive Engine Cluster. You can simply use the one on your laptop (single node). Or if you have a larger layline.io cluster elsewhere you, can deploy it there. To deploy we switch to the DEPLOYMENT tab of the Project:
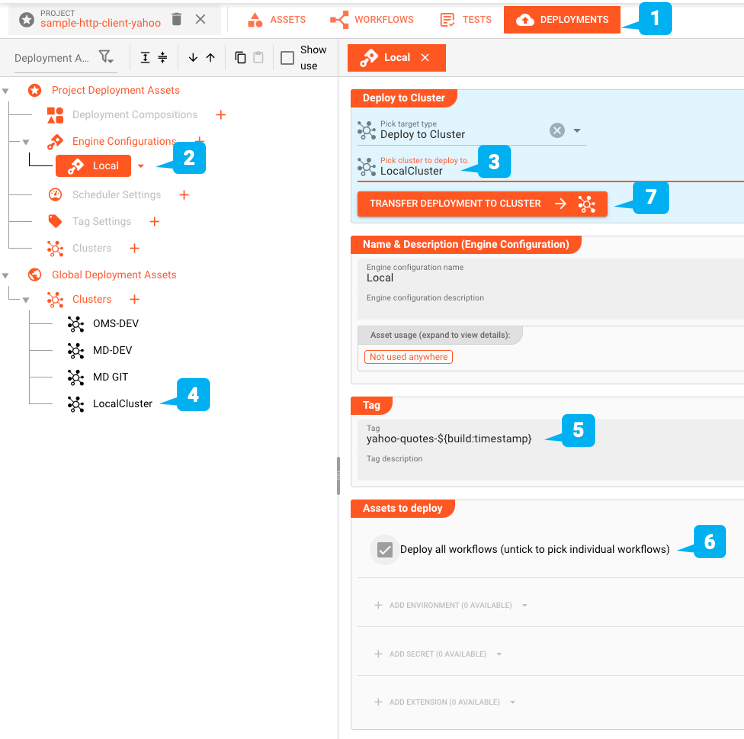
We create an Engine Configuration to deploy the Project. This defines the parts of the Project which we wish to deploy. In our example that would be the one Workflow we defined, as well as the Environment Asset that goes along with it.
Since we want to deploy to the local cluster we pick "Deploy to Cluster" and then our pre-defined "Local Cluster" setup. Every deployment needs a Tag. We use "yahoo-quotes-" followed by a macro "${build-timestamp}" to identify the Deployment. The macro will be replaced by a timestamp upon deployment transfer. This ensures that we always get a different tag with each Deployment.
We select to deploy all Workflows which we have created (just one). Lastly we start the transfer of the deployment by clicking "TRANSFER DEPLOYMENT TO CLUSTER" (Make sure the Cluster you are deploying to is up and running).
If the deployment went well you should see this:
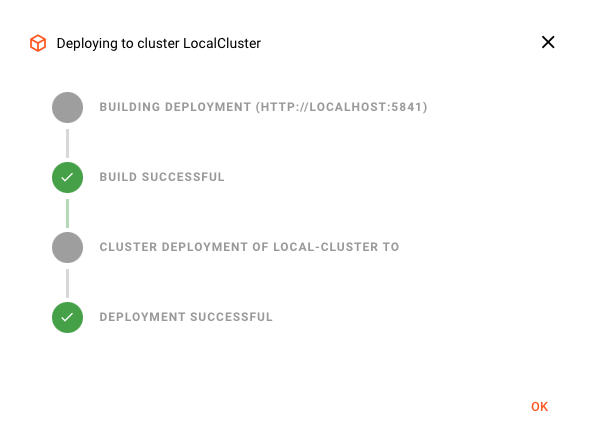
Otherwise, an error message will be displayed, guiding you on how to fix the problem.
Activating the Deployment
We should now be ready to activate the Deployment. For this, we switch to the "CLUSTER" tab. This gives us a view of all things "cluster". In case you are managing more than one cluster, make sure you have the correct one selected from the top left drop-down-box.
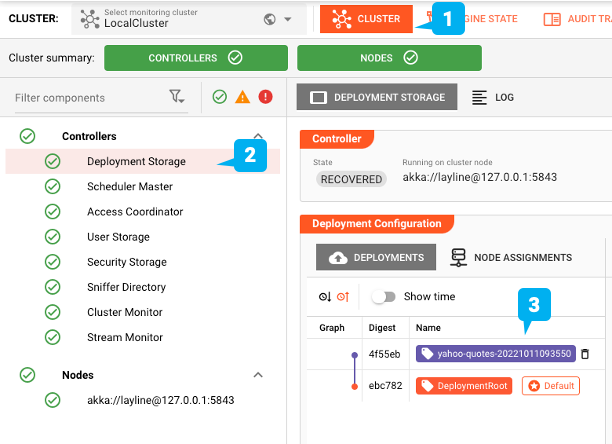
Make it the default Deployment
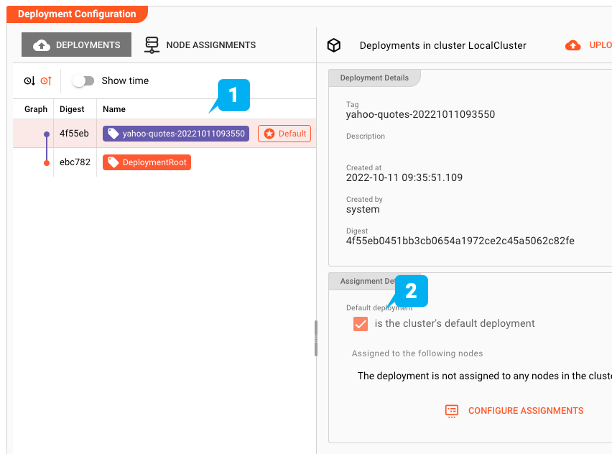
Select "Deployment Storage" from the tree on the left. This is where we find all the Deployments which are currently known to the selected cluster. In our example screenshot, in section "Deployment Configuration" we see 1 "DeploymentRoot": This is the basic empty default deployment which is always present. 2 "yahoo-quotes-20221011093550": This is the Deployment we just transferred to the cluster. To now activate the new Deployment on the cluster select it and then check the box "is the cluster's default deployment".
Schedule
Now that the Deployment is active on the Cluster, we need to check whether it is actually running any instances of the Workflow. If this is the first time you deployed this Workflow the answer is likely "no". Let's check:
- Select the "Cluster" tab
- Select the "Scheduler Master" entry in the tree on the left
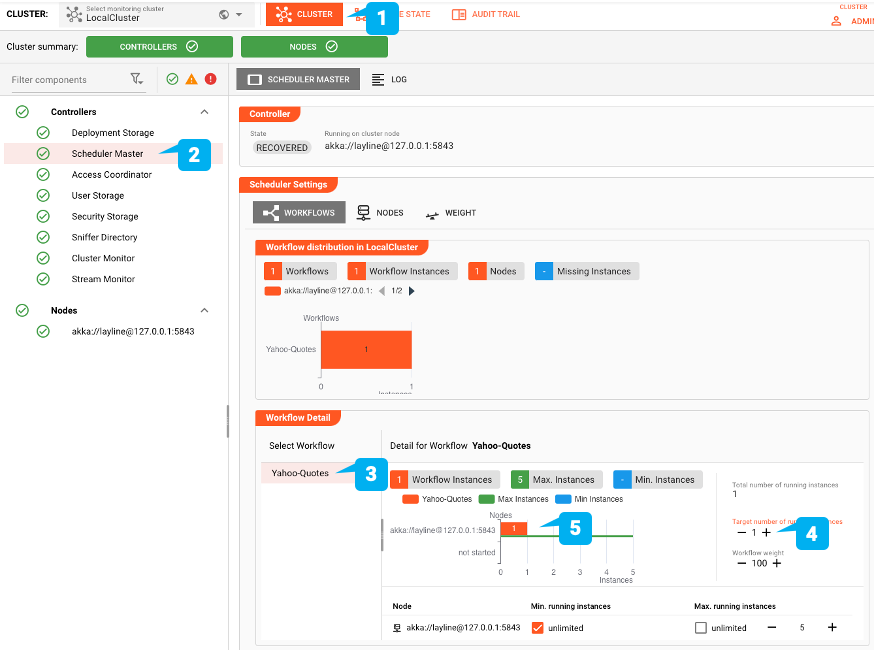
- In the Scheduler Settings Box select the Scheduler node in the tree
- Next make sure that the target number of instances is set to at least 1. Setting it to a higher number will start more instances of the same Workflow. Within a few seconds you should see the instance started. You only need to do this once. Next time you deploy the Workflow, the Reactive Engine will remember the number of instances you want to run off of this Workflow. You can also define the Scheduler settings you want as part of a Deployment. That's for another showcase, though.
Engine Status
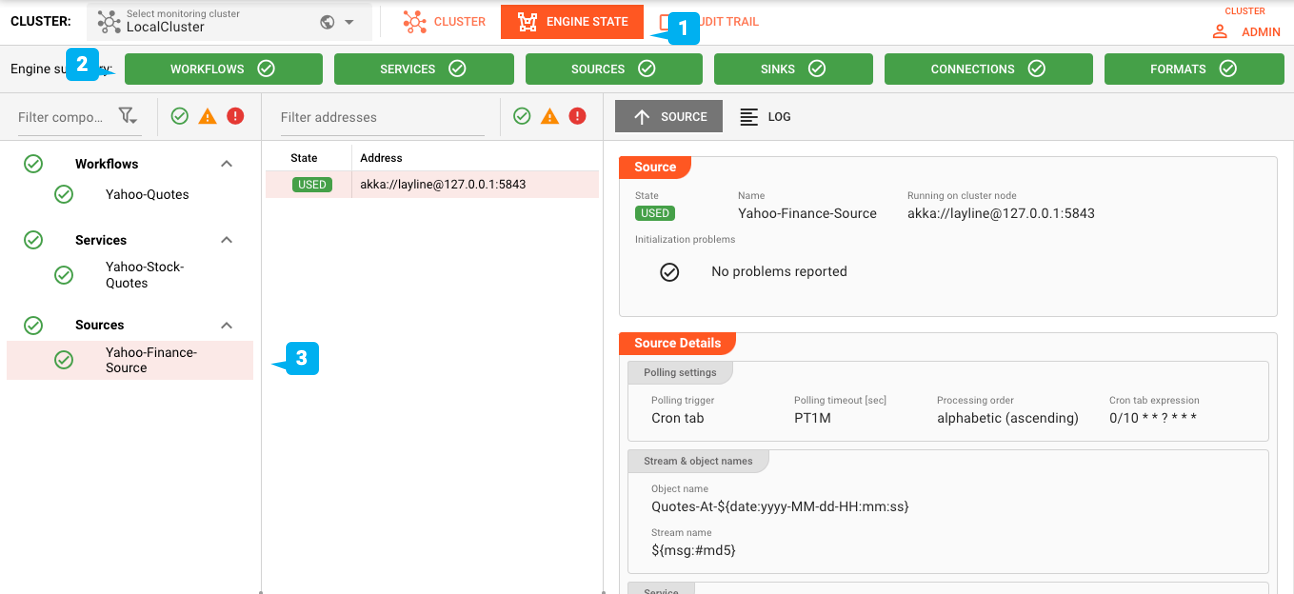
Switch over to the "Engine" tab. Make sure that all Engine categories are green. Also check the status of individual Assets in the tree to the left.
Checking Results
As soon as you have scheduled the Workflow (above), it starts polling Yahoo Finance interface for results every few seconds.
Head over to the Audit Trail tab to see the results show up in the Stream Log in JSON-format:
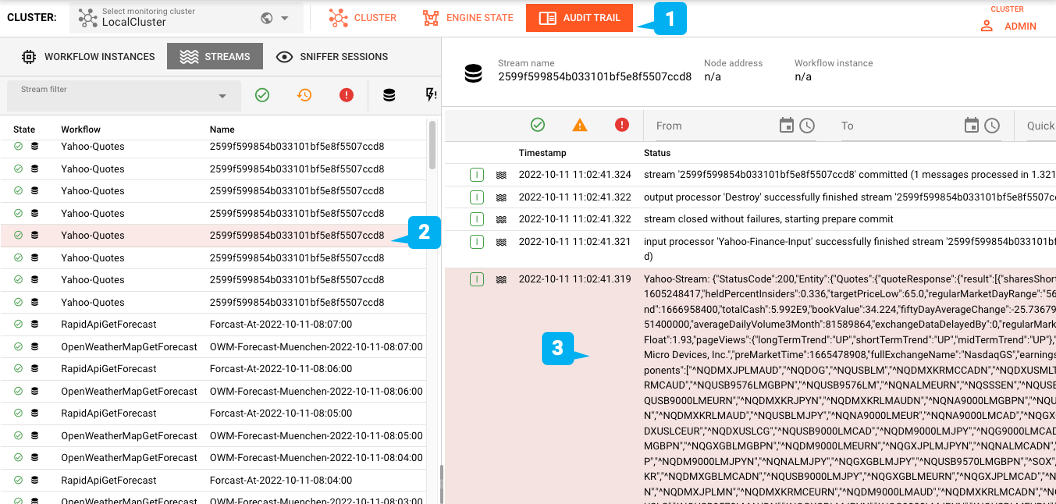
Of course, this output is for demo purposes only. In a real working environment you would process this data downstream in the Workflow.
Summary
This showcase highlights how you can create a Http-Client-Workflow on-the-fly without much hassle. And you get a lot more with that out-of-the-box:
- Reactive — Embraces the reactive processing paradigm. Fully built on reactive stream management at the core
- High scalability — Scales within one engine instance and beyond across multiple engines and distributed nodes
- Resilience — Failover safe in distributed environments. Full 24/7 operation and upgradability
- Automatic deployment — Deploy changed configurations with one click
- Real-time and batch — Run both real-time and batch data integrations using the same platform
- Metrics — Automatic metric generation to use in your favorite monitoring and alerting toolkit (e.g. Prometheus)
There are too many features to explain here. For more information please check the documentation or simply contact us at hello@layline.io. Thanks for reading!
Resources
| # | Resource |
|---|---|
| 1 | Github: Sample Http-Client for Yahoo Finance (input test files in the directory _test_files of the Project) |
| # | Documentation |
|---|---|
| 1 | Getting Started |
| 2 | Generic Format Asset |
- Read more about layline.io here.
- Contact us at hello@layline.io.